Post by timberley on Jan 5, 2015 23:20:09 GMT -5
Here's a little overview/review of the new Rapido VIA Rail F40PH-2D in HO scale. For Canadian passenger fans modelling any time from 1986 onwards, this is an absolute must-have locomotive, as it has been (and still is) the backbone of the VIA Rail locomotive fleet. For Amtrak fans, these did run south of the border on joint Amtrak-VIA services out of Toronto, and this is also a good preview of what the upcoming Rapido Amtrak F40PH will be like (hint: you won't be disappointed!)
There's lots of background info on the prototype on Rapido's website (and elsewhere on the web), so I'll just get straight to the model.
To start out, here's the beautiful (and sturdy!) box the unit comes in.

The packaging is quite impressive. One of my boxes looked like someone had tried to practice their soccer skills on it, and one corner was really smashed in. However, there wasn't any evidence of damage to the locomotive itself, or anything inside the box.
When you first open it up, the manual is right there on top. I know a lot of people don't bother to read manuals, but for a Rapido model, it's very much worthwhile. The manual is informative and instructive (as it should be!), but it's also quite entertaining. Jason's sense of humour really comes through, even when explaining how to program CVs. Given that these particular units operate differently than your typical DCC/sound units, reading the manual is a must (more on that shortly).

The contents of the box:
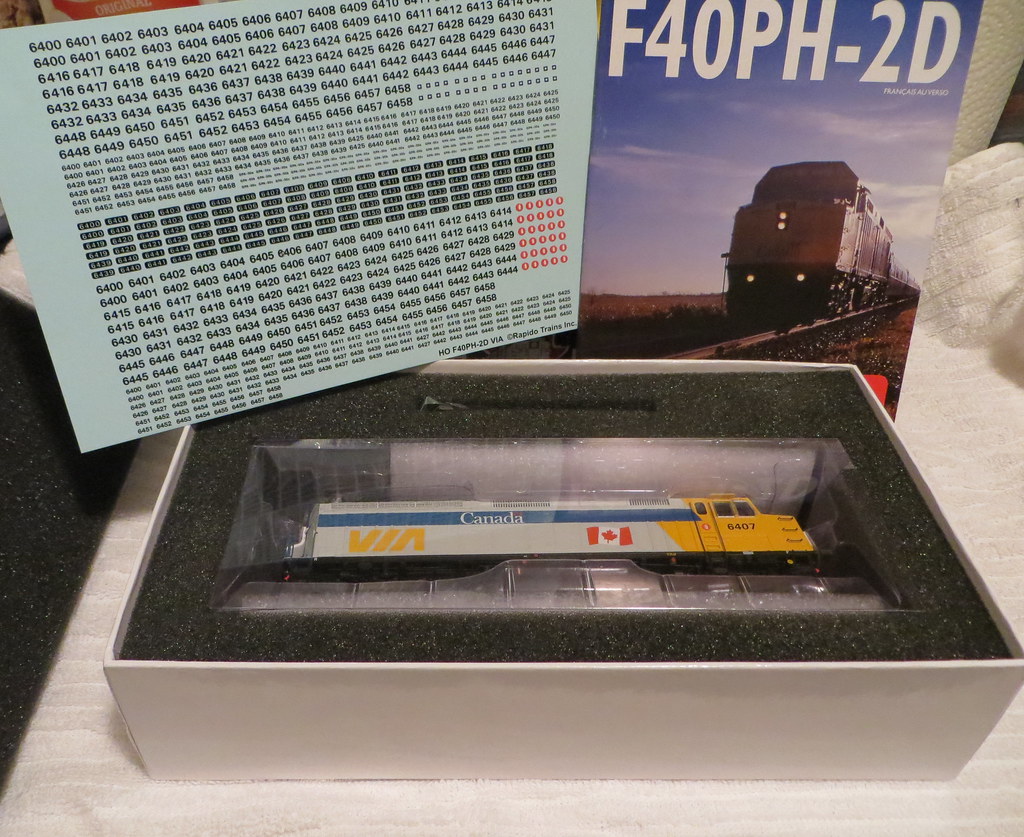
As you can see, there's a decal sheet included with fire extinguisher decals and numbers for quite literally every F40 in the VIA roster. Very useful for unnumbered models, and also great just to have on hand regardless. Rapido really goes all-out on the decal sheets, and I'm sure the Amtrak one will follow suit.
The loco, in its protective clamshell:

There's a little note on both the manual and the top of the locomotive packaging that looks like this:

The core message: READ THE MANUAL! What this all relates to is the DCC/sound operation of the locomotive, particularly with the HEP modes. Rapido has set up the loco so you have to press F8 to start the sounds (F8 also triggers shutdown), which is quite different from how many are set up (F8 is usually mute). This starts the locomotive in standard "freight" mode. The engine will rev up and down as you move, which is appropriate if you're either hauling freight (like modelling the units that were leased to CP for a while) or if you're hauling steam-heated passenger cars. If you're pulling HEP (head-end-power) equipped cars, then you need to put the unit into HEP mode.
This is done by pressing F4 to go into standby, where the unit will rev up to notch 6 but will not be able to move. This is appropriate for powering a train while idling at a terminal or in a yard. To actually run the unit, you then have to press F5 to go into "run" mode. The engine then revs up to notch 8 - the actual movement of the loco is controlled by varying the power to the traction motors, so the loco sounds basically the same regardless of its speed once in run (hence the "screamer" designation these locos have often received).
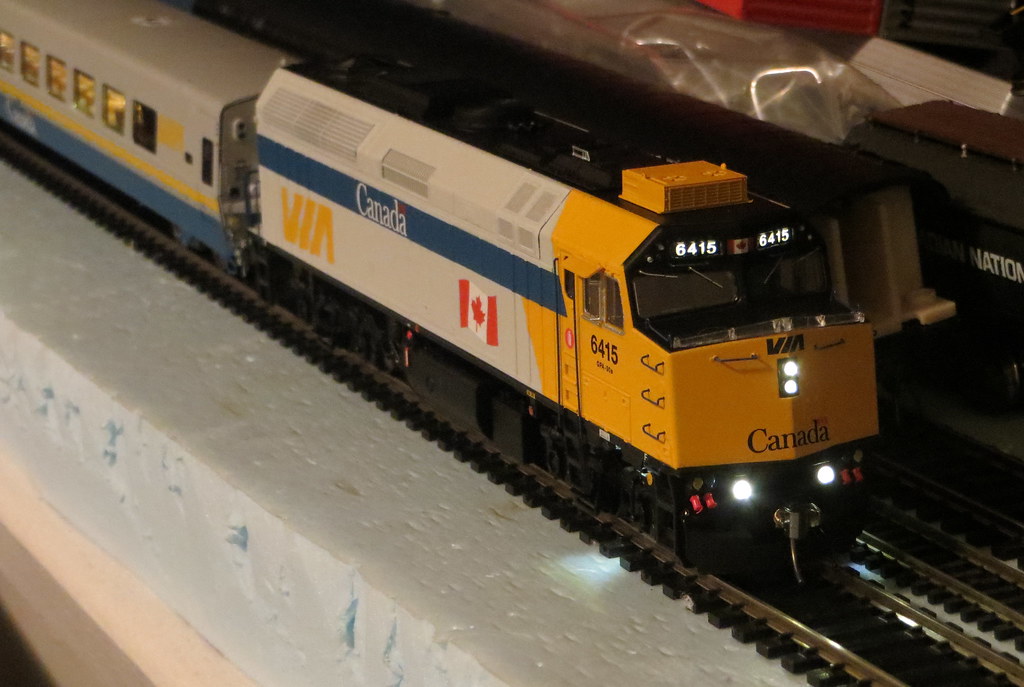
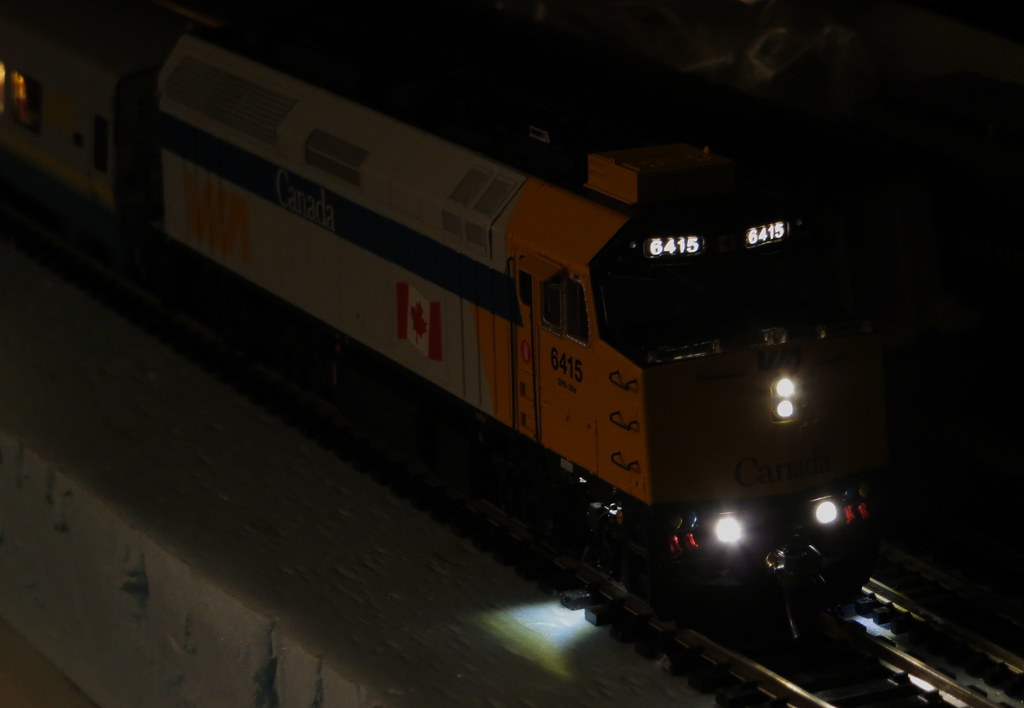
More on the sound later. For now, here are some photos of the locomotive straight out of the box. You'll notice this is the post-1998 updated "Canada" scheme.


Visually, Rapido have done an absolutely superb job on this locomotive. The fidelity to the prototype is spot-on, the overall level of detail is incredible (from all sides and underneath!), and the quality of the molding and construction is first rate. The photos above don't even begin to do the model justice. Details include full under-frame piping, full pilot details, lift rings, finely etched fans, see-through grills (with detail behind - check out the main radiator section in particular), and a full cab interior. You could probably look this thing over from every angle for an hour and still find new little details you didn't notice before. Just incredible. As I've said with other Rapido models, it really looks like they managed to invent a shrink-ray and just scale the real thing down to size.
The printing is all opaque and crisp, with all sorts of fine detail painting. One thing to note - they've included the fire extinguisher labels on the cab doors, but not on the side of the unit or the rear door. The presence and positioning of those decals varies from unit to unit, so Rapido wisely opted to leave them as decals for the modeller to apply.
Here you can see I've added the decal to the rear door on 6435. I will soon add it to 6415 as well, but 6415 was one of the units that had it added lower on the door rather than above the window. Some didn't get them at all, so checking photos is a must.
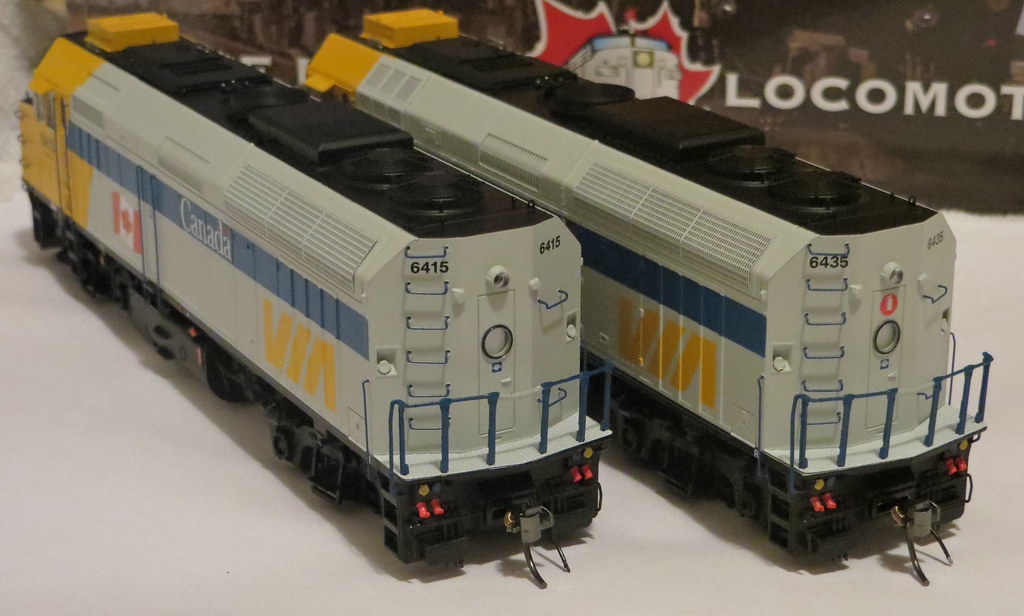
Also in the box are a few extra bits: a spare sinclair antenna [EDIT: not required on the Canada units, just a nice spare - thanks Manny], and later style filter covers for the air-intakes. These were added beginning around 1998, and eventually showed up on all units. If you're modelling more recently, you'll want to add them. If modelling around 2000-ish, you could put them on some units and not on others (as per proto of course). Here are the parts - they're etched metal and pre-painted, and take about 2 minutes (at most) to install:

Here's a comparison of 6415 and 6435, showing the original covers and the new covers installed:

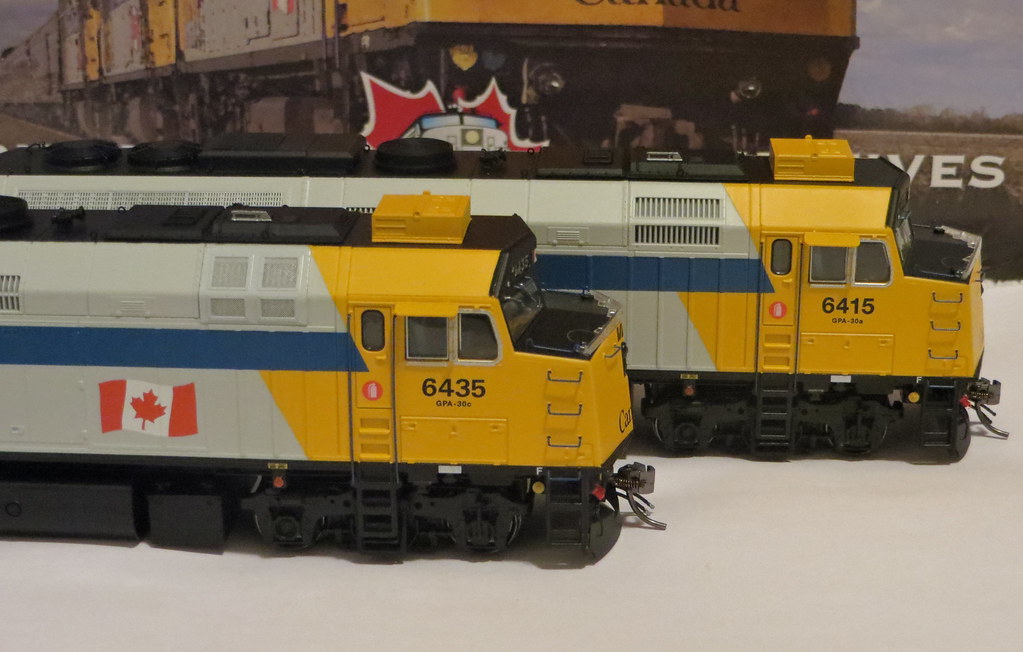
Here's another quick and easy out-of-the-box modification that I think is quite important: Rapido chose to install the windshield wipers hanging straight down. This is a decent option for easy installation, but have you ever seen an F40 with the wipers like that? I certainly haven't. On the VIA units, the standard position (when shut off) is for the inside wipers to be angled down at about a 30 degree angle, while the outer wipers are all the way up. By contrast, Amtrak's units usually had it set so the outer wiper was full down and the inside wiper was basically at the same angle pointing outward instead of inward. Have a look at 6435 below: I've tweaked the wipers gently with a pair of tweezers to position them more prototypically. Doesn't seem like a big thing, but I find it makes a huge difference in improving the look! Whatever you do in positioning them, make sure to check prototype photos. The two wipers on each window are connected in their mechanism and operate together, so only certain positions are actually possible (even if you're trying to model the middle of a rain storm!)
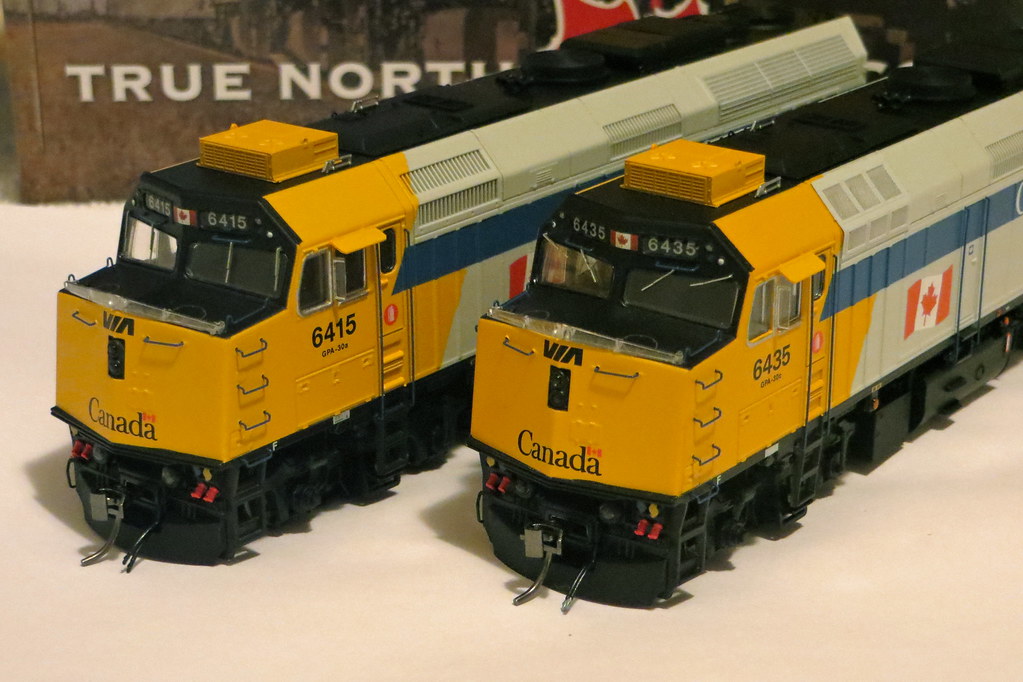
To finish off my comments on appearance, here's a quick underbody shot:
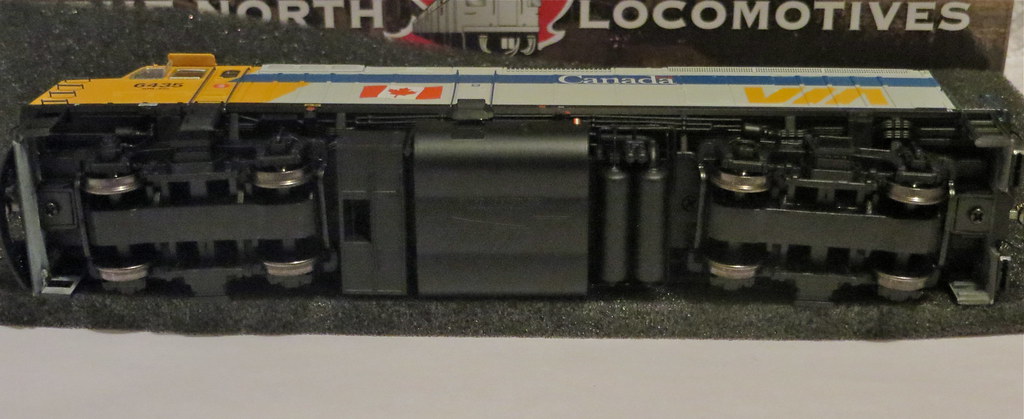
Summary: this locomotive looks absolutely stunning. Now, on to the operation, sound and lighting....
There's lots of background info on the prototype on Rapido's website (and elsewhere on the web), so I'll just get straight to the model.
To start out, here's the beautiful (and sturdy!) box the unit comes in.

The packaging is quite impressive. One of my boxes looked like someone had tried to practice their soccer skills on it, and one corner was really smashed in. However, there wasn't any evidence of damage to the locomotive itself, or anything inside the box.
When you first open it up, the manual is right there on top. I know a lot of people don't bother to read manuals, but for a Rapido model, it's very much worthwhile. The manual is informative and instructive (as it should be!), but it's also quite entertaining. Jason's sense of humour really comes through, even when explaining how to program CVs. Given that these particular units operate differently than your typical DCC/sound units, reading the manual is a must (more on that shortly).

The contents of the box:

As you can see, there's a decal sheet included with fire extinguisher decals and numbers for quite literally every F40 in the VIA roster. Very useful for unnumbered models, and also great just to have on hand regardless. Rapido really goes all-out on the decal sheets, and I'm sure the Amtrak one will follow suit.
The loco, in its protective clamshell:

There's a little note on both the manual and the top of the locomotive packaging that looks like this:

The core message: READ THE MANUAL! What this all relates to is the DCC/sound operation of the locomotive, particularly with the HEP modes. Rapido has set up the loco so you have to press F8 to start the sounds (F8 also triggers shutdown), which is quite different from how many are set up (F8 is usually mute). This starts the locomotive in standard "freight" mode. The engine will rev up and down as you move, which is appropriate if you're either hauling freight (like modelling the units that were leased to CP for a while) or if you're hauling steam-heated passenger cars. If you're pulling HEP (head-end-power) equipped cars, then you need to put the unit into HEP mode.
This is done by pressing F4 to go into standby, where the unit will rev up to notch 6 but will not be able to move. This is appropriate for powering a train while idling at a terminal or in a yard. To actually run the unit, you then have to press F5 to go into "run" mode. The engine then revs up to notch 8 - the actual movement of the loco is controlled by varying the power to the traction motors, so the loco sounds basically the same regardless of its speed once in run (hence the "screamer" designation these locos have often received).
More on the sound later. For now, here are some photos of the locomotive straight out of the box. You'll notice this is the post-1998 updated "Canada" scheme.


Visually, Rapido have done an absolutely superb job on this locomotive. The fidelity to the prototype is spot-on, the overall level of detail is incredible (from all sides and underneath!), and the quality of the molding and construction is first rate. The photos above don't even begin to do the model justice. Details include full under-frame piping, full pilot details, lift rings, finely etched fans, see-through grills (with detail behind - check out the main radiator section in particular), and a full cab interior. You could probably look this thing over from every angle for an hour and still find new little details you didn't notice before. Just incredible. As I've said with other Rapido models, it really looks like they managed to invent a shrink-ray and just scale the real thing down to size.
The printing is all opaque and crisp, with all sorts of fine detail painting. One thing to note - they've included the fire extinguisher labels on the cab doors, but not on the side of the unit or the rear door. The presence and positioning of those decals varies from unit to unit, so Rapido wisely opted to leave them as decals for the modeller to apply.
Here you can see I've added the decal to the rear door on 6435. I will soon add it to 6415 as well, but 6415 was one of the units that had it added lower on the door rather than above the window. Some didn't get them at all, so checking photos is a must.

Also in the box are a few extra bits: a spare sinclair antenna [EDIT: not required on the Canada units, just a nice spare - thanks Manny], and later style filter covers for the air-intakes. These were added beginning around 1998, and eventually showed up on all units. If you're modelling more recently, you'll want to add them. If modelling around 2000-ish, you could put them on some units and not on others (as per proto of course). Here are the parts - they're etched metal and pre-painted, and take about 2 minutes (at most) to install:

Here's a comparison of 6415 and 6435, showing the original covers and the new covers installed:


Here's another quick and easy out-of-the-box modification that I think is quite important: Rapido chose to install the windshield wipers hanging straight down. This is a decent option for easy installation, but have you ever seen an F40 with the wipers like that? I certainly haven't. On the VIA units, the standard position (when shut off) is for the inside wipers to be angled down at about a 30 degree angle, while the outer wipers are all the way up. By contrast, Amtrak's units usually had it set so the outer wiper was full down and the inside wiper was basically at the same angle pointing outward instead of inward. Have a look at 6435 below: I've tweaked the wipers gently with a pair of tweezers to position them more prototypically. Doesn't seem like a big thing, but I find it makes a huge difference in improving the look! Whatever you do in positioning them, make sure to check prototype photos. The two wipers on each window are connected in their mechanism and operate together, so only certain positions are actually possible (even if you're trying to model the middle of a rain storm!)

To finish off my comments on appearance, here's a quick underbody shot:

Summary: this locomotive looks absolutely stunning. Now, on to the operation, sound and lighting....
