|
|
Post by slowfreight on Mar 5, 2017 19:10:06 GMT -5
Noted...but my impression is that the 48-seat car fits better on the 60-seat core, not the 44-seat core as it has the roof ridge and some other things going on...plus the trucks are different.
Or am I completely confused?
|
|
|
|
Post by backshophoss on Mar 5, 2017 19:55:23 GMT -5
Believe you started off with the 60-seater as the "Core" for this project. Might be a good time for a nap  ,or caffine injection  . |
|
|
|
Post by slowfreight on Mar 5, 2017 20:20:44 GMT -5
Believe you started off with the 60-seater as the "Core" for this project. Might be a good time for a nap ,or caffine injection . Both are true. The life of a Reservist can leave you completely wiped by Sunday night. The modified car I showed, however, is a soon-to-be-ex Rock 44-seat ACF car. |
|
|
|
Post by slowfreight on Mar 26, 2017 18:22:02 GMT -5
Now that the basement is finished, I can return to modeling in earnest. Based on cab4's excellent roster list, I plan on building the following cars: 112 - ACF 44-seat BN green x2 129 - ACF 60-seat BN green 131 - ACF 60-seat GN blue 115 - ACF 44-seat GN blue 121 - ACF 44-seat GN blue 117 - ACF 60-seat foobie EB My 117 will hopefully get replacement etched sides, but in the mean time will run as a foobie so I can have one car in orange/green. I'm building 2 of the 112 because I found 2 Rock Island cars for cheap and figured someone here would like one...building 2 is almost as quick as 1 once you figure out where to make the cuts. As far as I can tell, the total lettering involved is the DoT herald and a car number centered on each side...not sure of the font, but will dig through my collection for something small and white. My old bottle of Floquil GN blue is enough grayer than the factory paint that it should be a good match for the NJ-applied patches. I haven't thought too hard about weathering these yet. Converting the traps on the 44-seat car is proving easy now that I know the right measurements. I will post more detailed pics and instructions if anyone is interested. Next will be the 60-seat car. |
|
|
|
Post by slowfreight on Apr 12, 2017 22:37:09 GMT -5
OK. Time to make good on this project. Step-by-step, here's how you can upgrade your own cars for a more faithful model. Quite a few of you know how the stock Walthers car starts out: 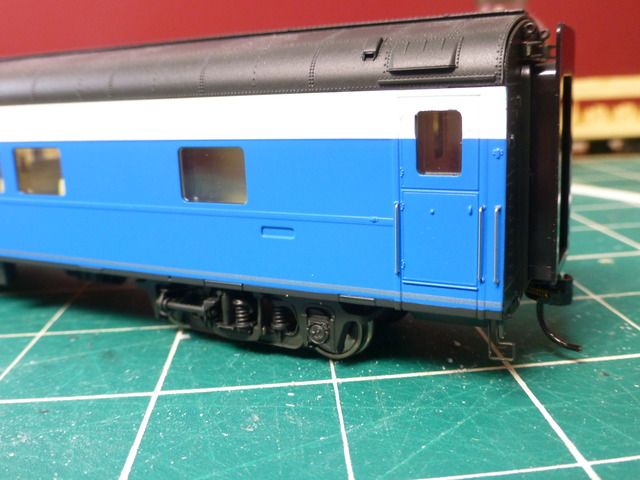 Folding traps must go. It's not hard, though. First, flip the car over and remove the trucks. Next, score along the bottom of the folded trap so that you can snap it off, like this. 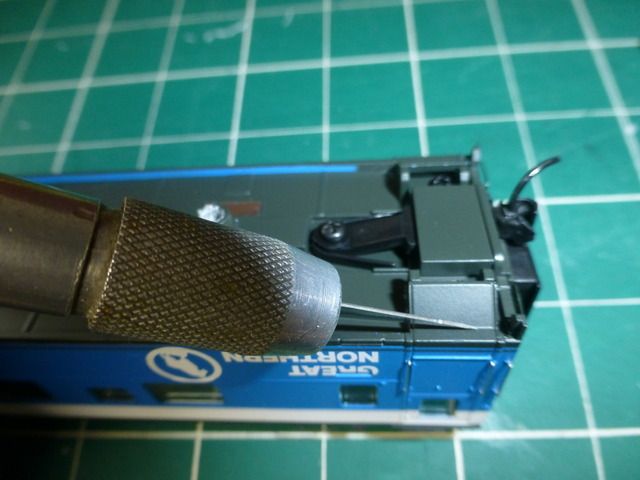 Next, unscrew the coupler pocket cover and save it for later. Grab the trap well casting and gently twist it off. If it doesn't pop easily, you can get under it with a #17 chisel blade. 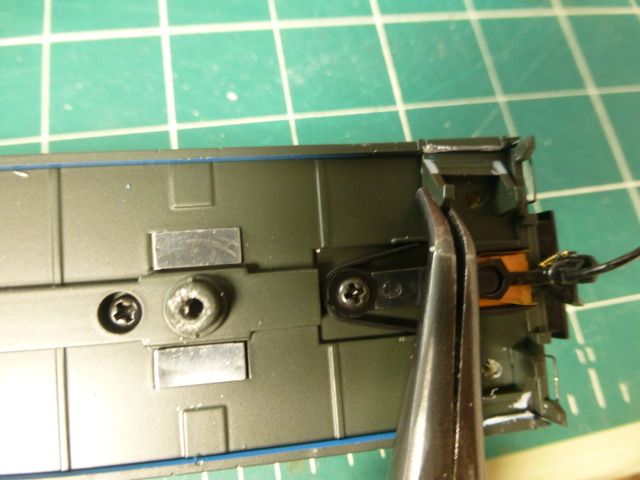 Next, we need to move the screws that used to hold the coupler pocket cover, as they hold the B end of the car together but the original screw holes will disappear when we add the rigid traps. I drilled 2 new holes with a pin vise fairly close to where the trap well castings used to sit. They're self-tapping and will go right in, but drill deep as you may be running into interior partitions and you don't want the screws to push the floor away from the interior. 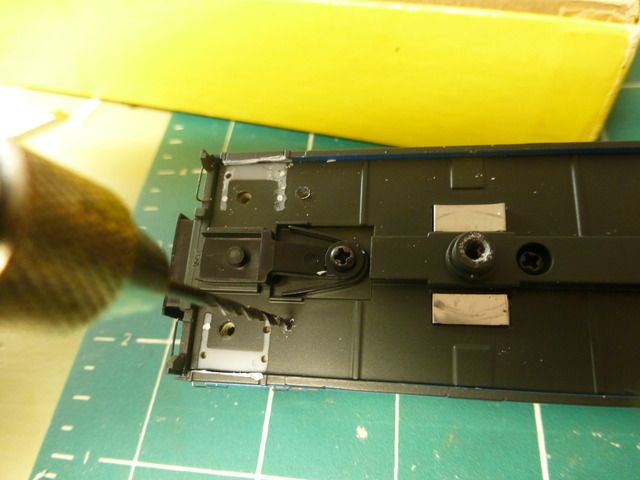 Now it gets fun, because these cars are meant for the sides to go on, not come off. First, pop off the roof and remove the lighting kit. To remove the sides, start with the top inner tabs and work outward. Push them down with a screwdriver to unhook, and then push out. The factory seemed to add a little glue at the ends, so you want to slice with a knife on either side of the tab to break the glue joint. Once the top of the side is free, it should pull out along the bottom. You will break tabs. Save them to glue back on. You can see in the photo where the glue held the corner to the interior casting. 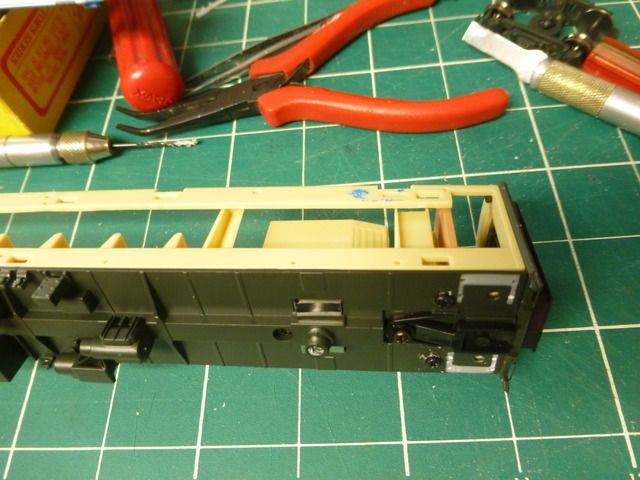 Now comes the fun part--cutting the trap opening. I use a razor saw that fits the Xacto handle. Fortunately, it's pretty easy to cut in the right places. Start by cutting down along the edge of the interior end wall. The wall forms your guide. 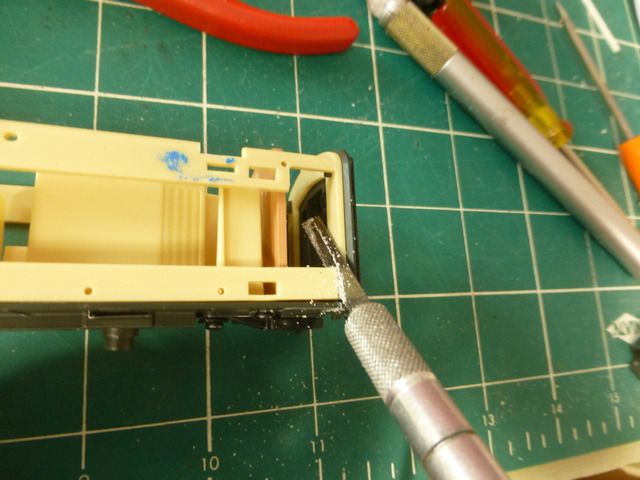 Next, do the same along the inner bulkhead wall. Do this carefully so you don't scuff the paint too badly, or use a piece of masking tape to protect the finish. I'll have to touch it up, but I think I have the right color somewhere in my inventory. 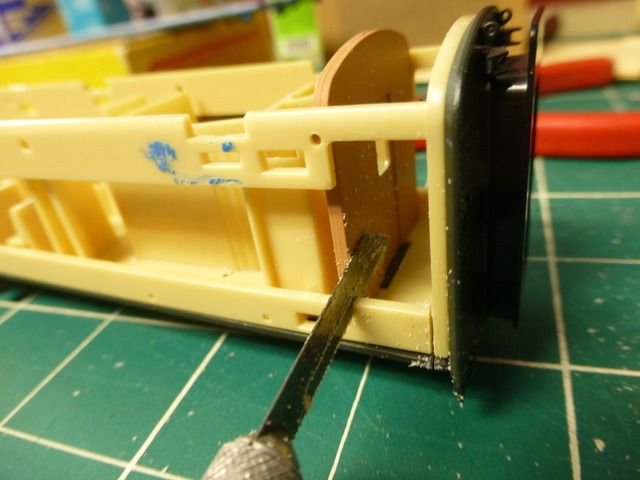 Continue slicing along the floor, still using the walls as a cutting guide. You'll want to go a little past the end of the original trap casting. I went short, and spent more time with a file making the cutout deeper. 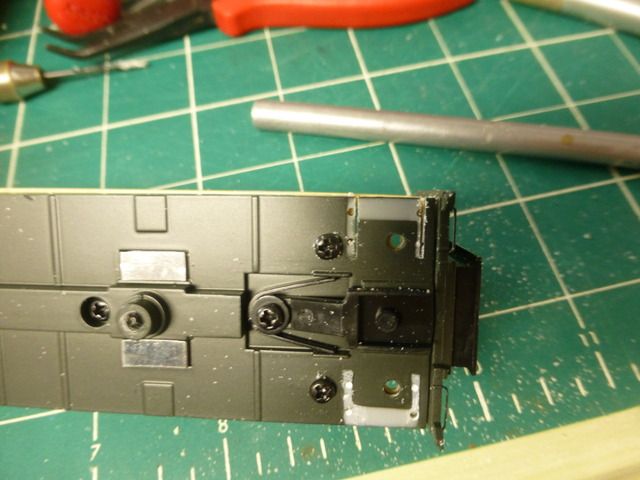 Next, prepare the PCC casting by removing the flat lip on one side, and file the side smooth. 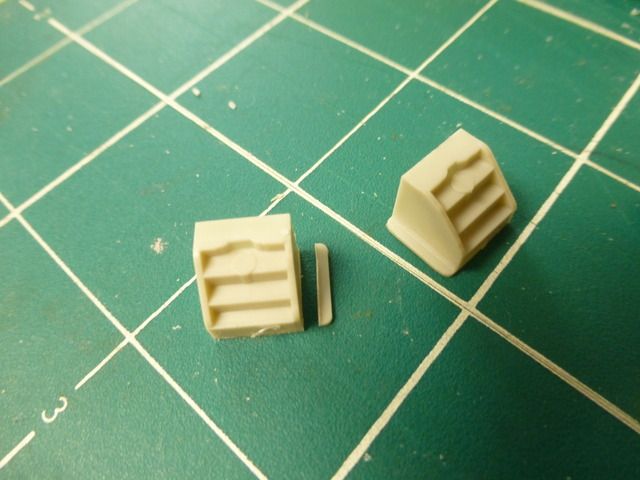 Go back to the sides you removed, as it's time to finish cutting out the folding trap. I like to work my cut a little shy of the mark and finish it up with a file, but use the same razor saw to make the vertical cuts, and score/snap below the bottom of the lip representing the trap floor as shown. Make sure that you keep the raised lip below the door when you cut. Once done, use a file to clean up the opening. 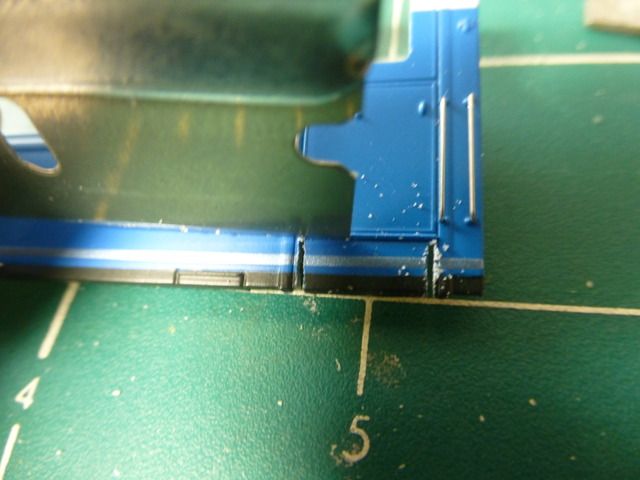 Now it's time to square up the opening in the floor and test-fit the trap. The face of it should be angled, but getting the thing to sit correctly is dirt simple. The top of the casting should be level and flat with the vestibule floor. If you get that right, you'll have the right angle to the step castings. 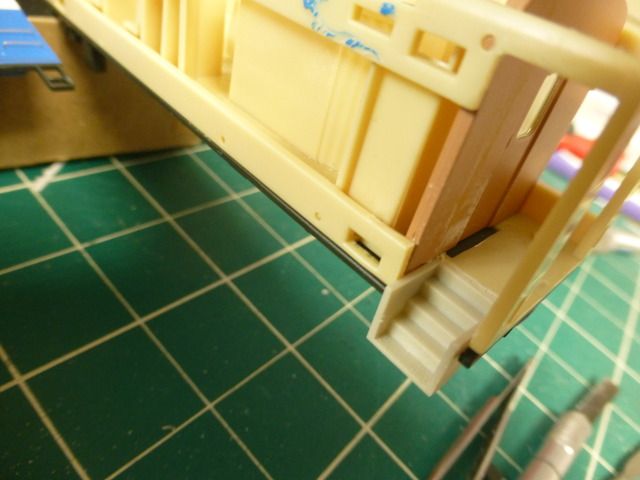 You'll need to adjust the depth of the floor cutout to get the trap to sit far enough in to the car when the side is back on. You can see here that the casting sticks out too far, and I need to file more material away in the back of the opening. 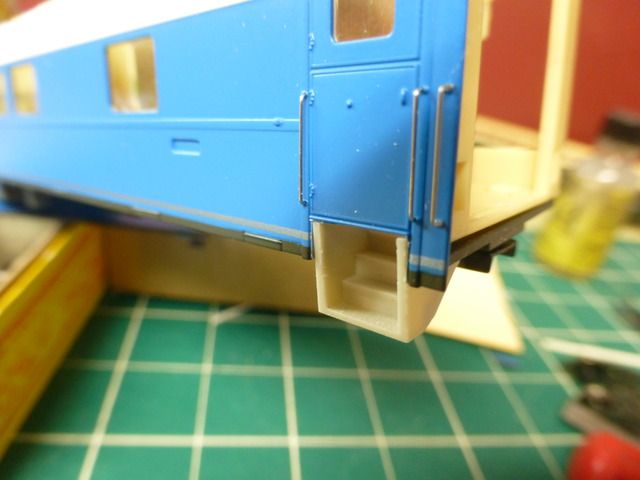 Well, that's all the progress I've made so far. More to follow once I get back to the bench. |
|
|
|
Post by slowfreight on Apr 16, 2017 23:00:48 GMT -5
Sorry to skip ahead a few steps, but I got a good roll on the first three cars this weekend. Here's the results so far: 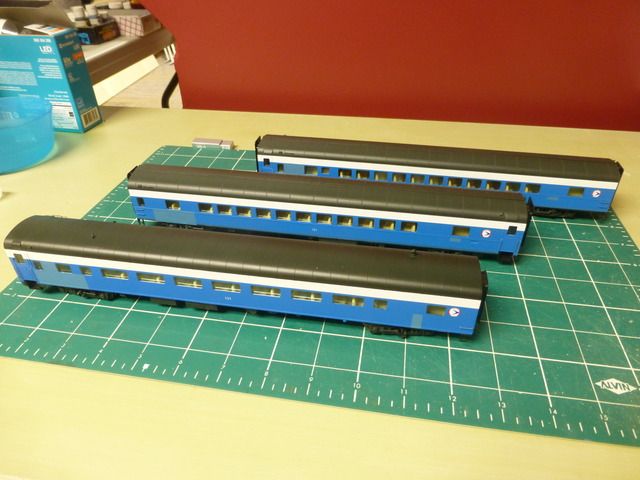 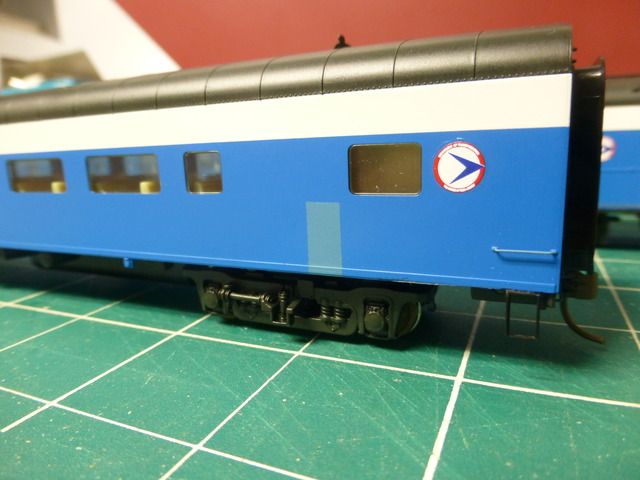  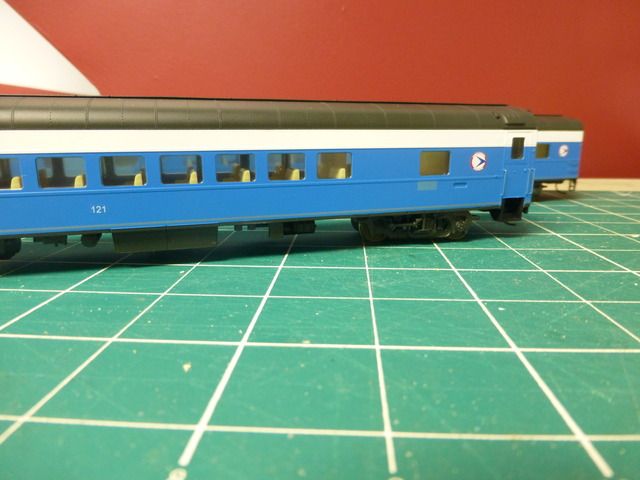 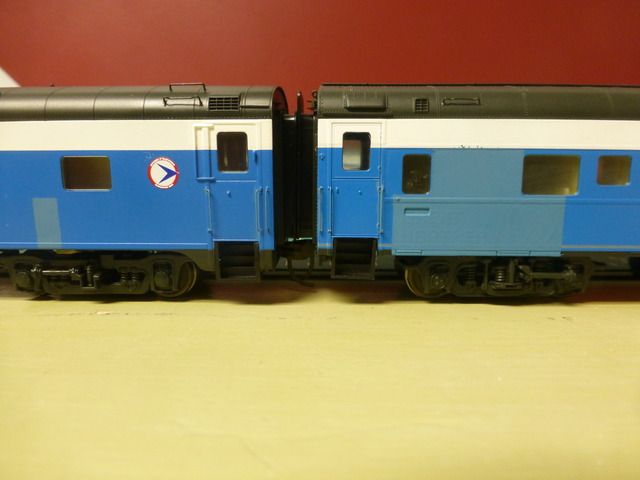 Cars 115, 121, and 131 are now ready for weathering, which will make the steps a little easier to see. If I were starting from scratch, I would probably sand down the logos after masking for painting, as the pad-printed lettering is visible under the patches. Patching was inferred from my collection of photos and some youtube videos. In typical NJDoT fashion, lettering is limited to car numbers on the sides (centered, 18" up from bottom of car) and a logo, which appears to be placed on the right end of the car every time. It appears some cars had white grabs and others did not, so I split the difference and painted them all with the same Floquil GN blue that doesn't match the Walthers paint. Cars were sealed with Testors Metallizer Sealer, which is satin finish. The coupler covers were trimmed to remove the screw tabs, and much as I hate to glue couplers in permanently, the easiest way to reassemble was to CA the covers back in place. Wheelsets and couplers were all painted rail brown before final assembly. The 60-seat car was a bit more challenging than the ACF cars, as the last of the skirt had to be removed at the A end of the car. Fortunately, I had some Intermountain sill steps in another kit that were perfect for replacing the sill steps I removed. I think I will strip/repaint the cascade green ACF car, and hold off working on the other 2 60-footers until I see if Brass Car Sides will run the 48-seat side. |
|
|
|
Post by backshophoss on Apr 16, 2017 23:36:03 GMT -5
Those cars really look the part,the patches included,there was a 2nd patch after NJT was created,and the NJDOT logos
disappeared
|
|
|
|
Post by slowfreight on Apr 24, 2017 20:15:56 GMT -5
Made good progress this weekend. My two Rock Island 44-seat cars went through a bit of a transformation. I now have car 112, twice over. This is the only broken hockey stick 44-seat car. 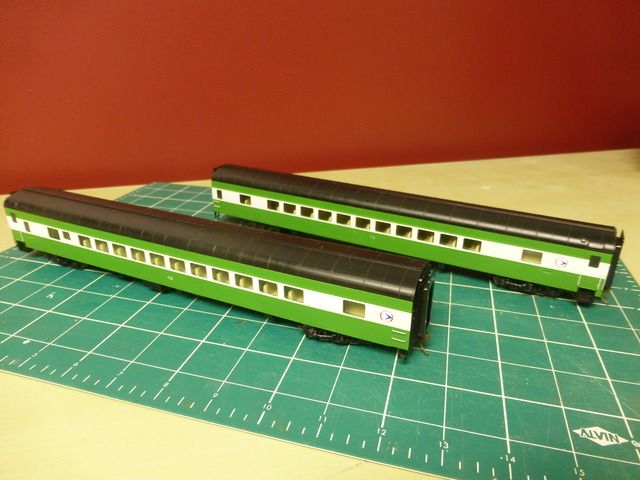 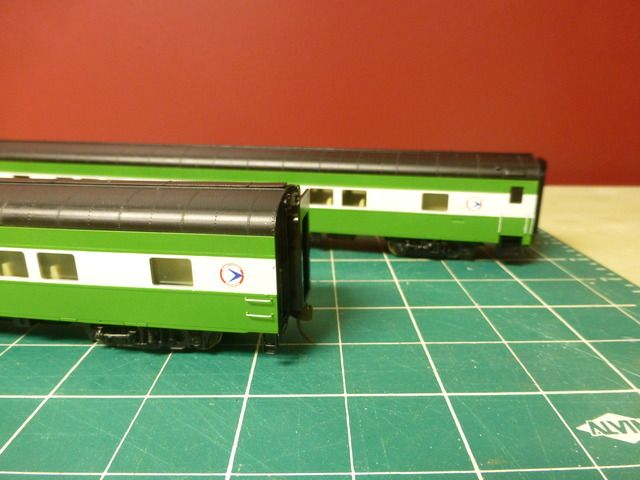 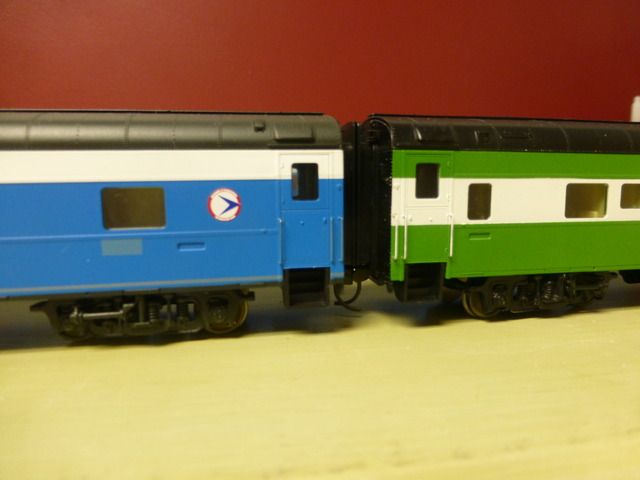 The cars received the same modifications as the previous cars. In this case, I sanded off the lettering with 1000 grit paper just to make sure it wasn't ghosted. I kinda guessed from photos that the grab irons might be white, but I could be wrong. Here is the current fleet, prior to weathering. 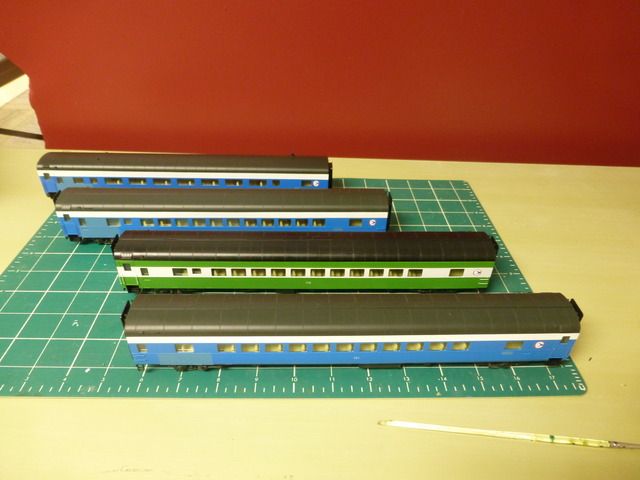 I've changed my mind about having a cascade green 60-seat and foobie EB orange/green. I am now leaning towards building two EB orange/green 48-seat cars using my two remaining 60-seat cars. I messaged Union Station Products to see if their sides might be easier to adapt than brass sides. |
|
|
|
Post by backshophoss on Apr 25, 2017 16:40:41 GMT -5
The "Bay Head Builder" consists were always a "mixed bag" of every scheme out there,including NJDOT and early NJT repaints.
|
|
|
|
Post by slowfreight on Apr 29, 2017 8:57:24 GMT -5
So in the process of researching, I just learned that the broken hockey stick cars were a patch job from original BN hockey sticks, courtesy of the CNJ. Before: www.fobnr.org/bncarlist/passenger/bnp1221.jpgAfter: www.northeast.railfan.net/images/cnj108.jpgIt's hard to tell how the paint weathered down, but I have a Pactra green that may work to simulate the patch. It'll mean masking and sending these back to the paint shop, but I'll keep looking for a later-era picture that might show me how much the paint differed. |
|
|
|
Post by backshophoss on Apr 29, 2017 18:02:52 GMT -5
You should get a "military" green to match what the CNJ did,looks like they didn't care to attempt to do a color match!   |
|
cab4
Member

Posts: 149
Primary Railroads: Conrail, NJ DOT, Amtrak, SEPTA, NJT
|
Post by cab4 on Apr 30, 2017 9:40:54 GMT -5
That all looks fantastic.
I've got an Undec car I've been meaning to paint up in green. I put some of the NJ DOT logos on mine, but I haven't been working on them to much lately, focusing on my Jersey Arrows.
Not sure if it eventually got patched, but it looks like car 129 retained its hockey stick stripe and BN logos a little longer than the others, going from pictures. Its a 60 seat ACF car.
**EDIT***
also, I have updated my CNJ car list with more confirmed by photo paintschemes, but I haven't yet updated the google docs.
|
|
|
|
Post by backshophoss on Apr 30, 2017 21:47:40 GMT -5
Believe CNJ repainted the white stripe when relettering the car,NJDOT may have bought the paint.
The "Patch" "broke" the stick and covered the BN lettering,that patch seems to be a green/blue
that could be matched to a military color in 1 of the testor's paint lines.
Most likely a European military color.
|
|
|
|
Post by slowfreight on May 1, 2017 0:14:46 GMT -5
To me, it looks more like clean/fresh vs. hazed DuPont Imron paint. Look at the BN unit at IRM and notice how deep the color is on the panels that have been buffed out. www.irm.org/gallery/BN9908restoration/abmIn the case of Floquil, since it's dead flat, I saw the same color change when I blew the TruColor satin finish over the Floquil BN green. However, I think I might duplicate by adding a drop or 2 of dark green into the BN green, rather than looking for someone that stocks Model Master paint around here. Meanwhile, the last two cars will be 117 and 134, both in EB paint. I will spend some time with my 60-seat car and calipers working out the dimensions, and will have Union Station Products cut the sides to order. He has already offered to redraw his current plan for the 48-seat car to match my specifications. Got my fingers crossed, too, that by simply rearranging the underbody detail that I can get pretty close on the model. www.railcarphotos.com/PhotoDetails.php?PhotoID=75005rr-fallenflags.org/gn/gn-co134akg.jpg |
|
|
|
Post by slowfreight on May 30, 2017 21:36:39 GMT -5
I've now found good photos to show that the ex-BN broken hockey stick cars were a CNJ paint mod: www.northeast.railfan.net/images/cnj110.jpg Unfortunately I haven't had the time to mask and patch...the few days when I am home keep getting occupied by other priorities. In later photos around my timeframe (6+ years of weather), the patches tended to weather as chalkier finish than the original. rr-fallenflags.org/cnj/cnj-co118akg.jpg I'm guessing BN was using a higher quality paint. Since the original Floquil is dead flat until I hit it with gloss finish, it looks paler and chalkier than the current finish coat. Sadly, the best way to model this would have been to mask the patches before hitting with gloss. Instead, I'm going to have to mask off the patches and hit it again. |
|


 ,or caffine injection
  .
.


