timberley
Member
 
Posts: 189
Primary Railroads: VIA Rail Canada, AMT (Montreal)
|
Post by timberley on Mar 2, 2015 9:57:36 GMT -5
Here are two of my most recent projects, which have been in the works for a while (I started work on both well over a year ago). These were also my first attempts at using Alclad2 to simulate stainless steel. The first is a VIA Rail ex-UP Budd slab-side baggage. The real car started life as a part of UP's 5900-series of RPO cars. The first bunch were built by ACF, and the end of the order was built by Budd. Both used identical door and window arrangements. The cars ended up with VIA in the mid-90s, and were converted to full baggage cars. Equipped with HEP and MU pass-through lines, they operate today across the VIA system mixed with HEP1, HEP2 and LRC equipment. To build this car, I used AMB laserkit sides for an ACF 5900 series RPO, and then added slab-side fluting from Union Station Products. The sides were mounted on a Walthers Budd coach as a core, and I made many modifications to the roof, ends and underbody (including lots of scratchbuilt parts). I also framed the doors, and added some other details on the sides. I also made new baggage doors with proper Budd-style windows. For painting, I followed the fantastic directions provided here (and elsewhere) by AntonioFP45 (to use his ever-familiar screen name). I used Alclad2 "Chrome" over a base-coat of NYC light grey. I know Antonio has more recently switched to using their 105 polished aluminum, but I have a bottle of chrome on hand and my LHS was fresh out of #105. So chrome it was! It will definitely still take some tweaking to get better with this stuff over time, but for an early attempt, I'm quite happy with how this turned out. And there's no doubt in my mind, I will NEVER be painting a stainless steel passenger car with silver paint ever again! 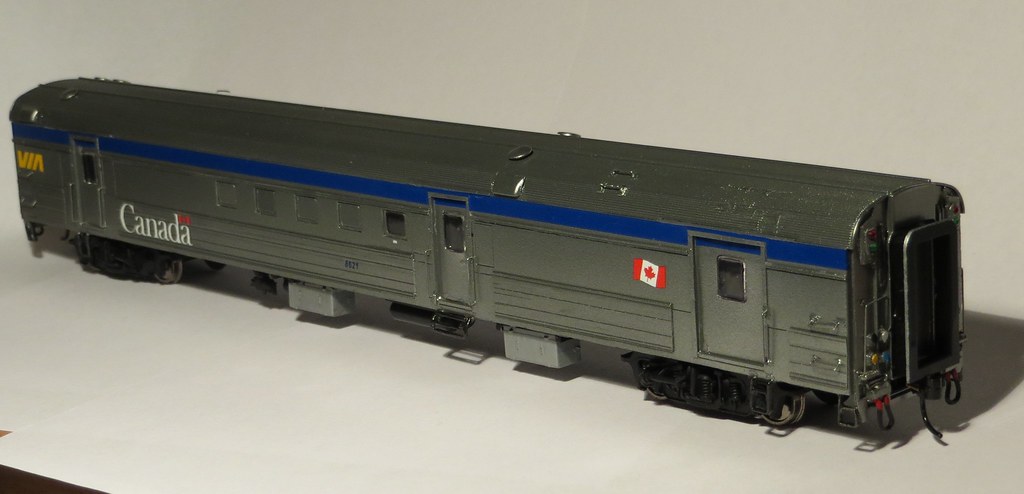 The second car is another ex-American car that VIA acquired in the '90s. This one is an ex-NYC coach that passed through a few owners before making it to VIA, where it was rebuilt to HEP1 standards, including a new interior identical to the ex-CP cars in VIA's roster. For this car, I used sides from USP for a NYC Budd coach. USP kit 9613_004r has the right window arrangement for this car, but unfortunately the windows are the wrong size. They need to be wider and also shorter (height-wise). So I cut them out to widen them, and reduced the height with some strip styrene. I didn't do as nice of a job as I could have with cleaning up the tops of the windows (where I added the strips), so it looks a little rough there. But overall, I'm quite happy with the outcome. Still needs a few end details added and a retention tank built to go underneath, but it's pretty well done. Again, same Alclad application as above. I'm not yet getting as nice results as Antonio does, but I think I know the areas I need to improve (better job with the gloss finish before applying the Alclad), so I know what to do to improve. And to be honest, even a not-quite-perfect Alclad job still looks infinitely better than any silver paint job! 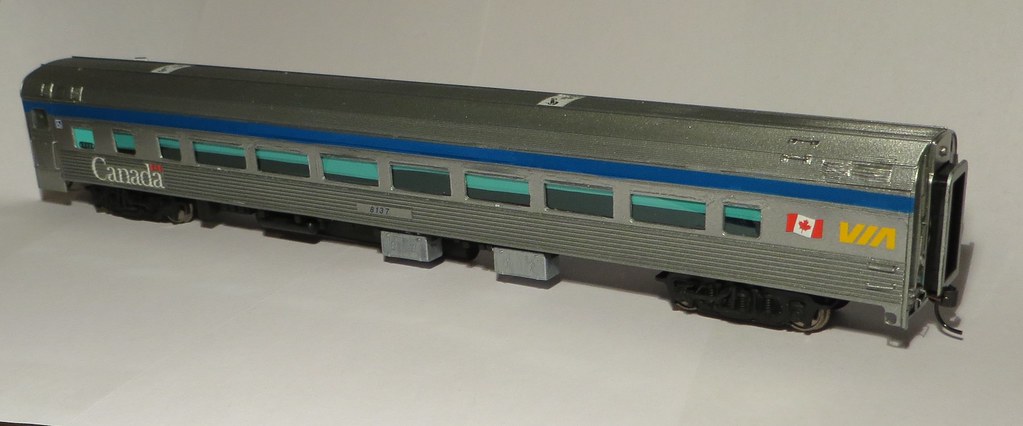 You may notice there's some "scarring" on the roof near the end in this photo. That was where I had to remove cast-in roof vents, and attempted to "repair" the fluting....with limited success... 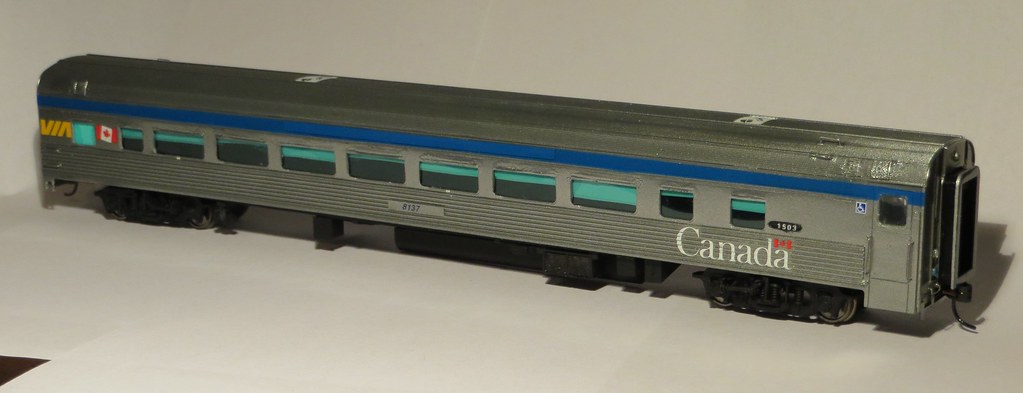 I have since done a third car with Alclad (I'll show that one off too once I'm done work on it), and I'm much happier with how it turned out. So improving with each job, and starting to get the hang of it! |
|
|
|
Post by backshophoss on Mar 2, 2015 19:52:14 GMT -5
Nicely done.
|
|
|
|
Post by acelaphillies on Mar 3, 2015 16:44:51 GMT -5
Wow, great job. Do you have any pictures before you painted them. I would be interested to see all of mods before they were blended in. You really have a knack for prototype modeling.
|
|
timberley
Member
 
Posts: 189
Primary Railroads: VIA Rail Canada, AMT (Montreal)
|
Post by timberley on Mar 4, 2015 11:39:24 GMT -5
Thanks guys! @acelaphillies - I'll have to take a look, but I'm really not sure. I often end up wishing I had taken better in-progress photos of some of these builds, and then always forget to do so the next time.... As for prototype modelling, I think that's what comes from having an obsession with one particular prototype - I've been a VIA nut since I was a kid, and have never been really happy with stand-ins for the unique equipment VIA has. Now I'm finally to the point where I can fill in some of the gaps  |
|
|
|
Post by acelaphillies on Mar 4, 2015 23:01:16 GMT -5
I think you are right. When you follow a railroad for a while you begin to know the prototype inside and out (if you are a railroader you know even more), and then you start wanting to model the unique equipment.
|
|
|
|
Post by backshophoss on Mar 5, 2015 0:30:11 GMT -5
You tend to look for certain details to be at certain locations,after a time,
a quick glance you can id the car or detail is correct.
There are times when even the Sheet Metal guys(aka "Tin Knockers")can have a "bad day"
or that was enroute damage.(A stray rock/tree falling,hitting the car)
|
|
timberley
Member
 
Posts: 189
Primary Railroads: VIA Rail Canada, AMT (Montreal)
|
Post by timberley on Jul 22, 2016 7:40:48 GMT -5
Here's another Alclad car I've recently finished (I did the Alclad a while ago, but only finished the complete car recently). It's a Pullman Standard fluted 6-6-4 sleeper. The prototype started with the Boston and Maine, and was one of several cars purchased second hand by CN, and then inherited by VIA. These were among the only fluted P-S cars that CN/VIA ever had, and were painted in the same scheme as VIA's early RDCs and Tempo cars, rather than the scheme applied to their ex-CP Budds. It's before my time really, but there was a local interest because these cars were once common in the Maritimes, and I just loved the unique look of these cars. For any fans of the show "Community", you can probably guess why I picked to model "Greendale"  The model was built from Union Station Products car sides on a Rapido Green sleeper as a core. Painted with Alclad (chrome over NYC dark grey), and lettered with CDS dry transfers. Getting those into the fluting was not easy! Like the prototype, the ends are just painted silver, rather than metallized. I originally thought these cars had black ends, because they tended to get awfully dirty in service! I've tried to weather to match that look. 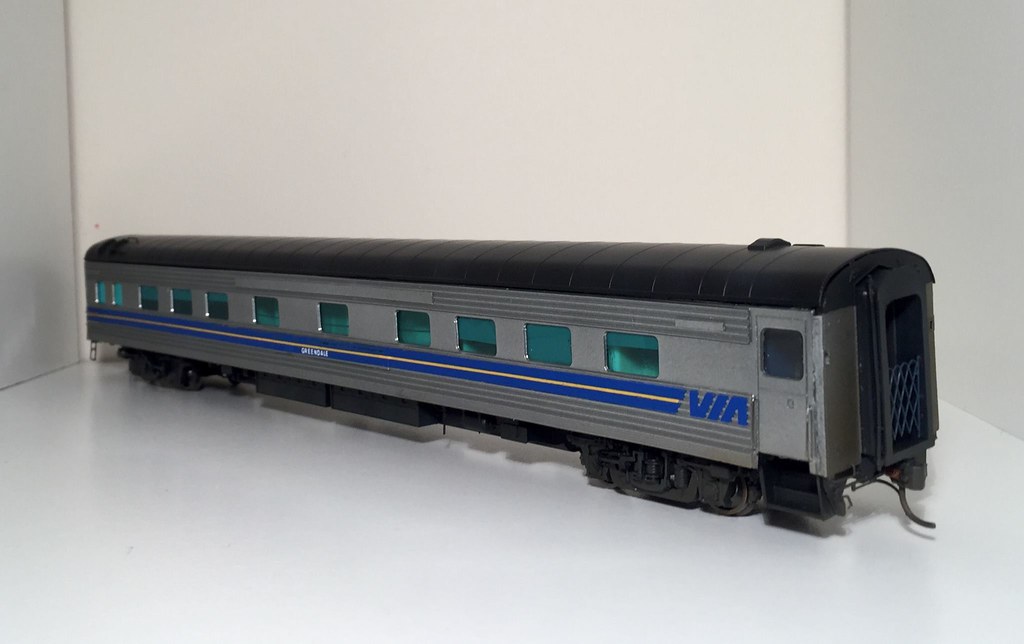 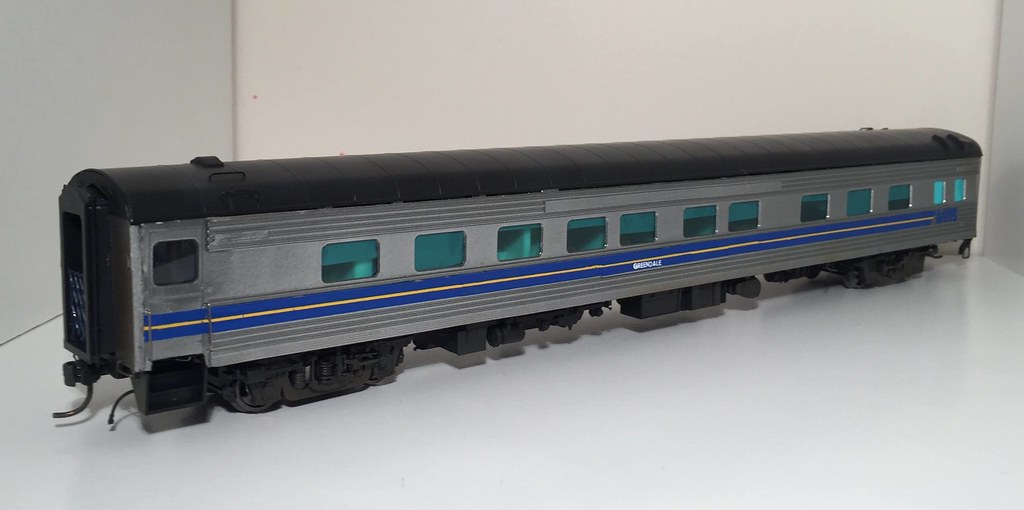 This last photo really shows off what I love about the Alclad. You can't get a look like that with silver paint! 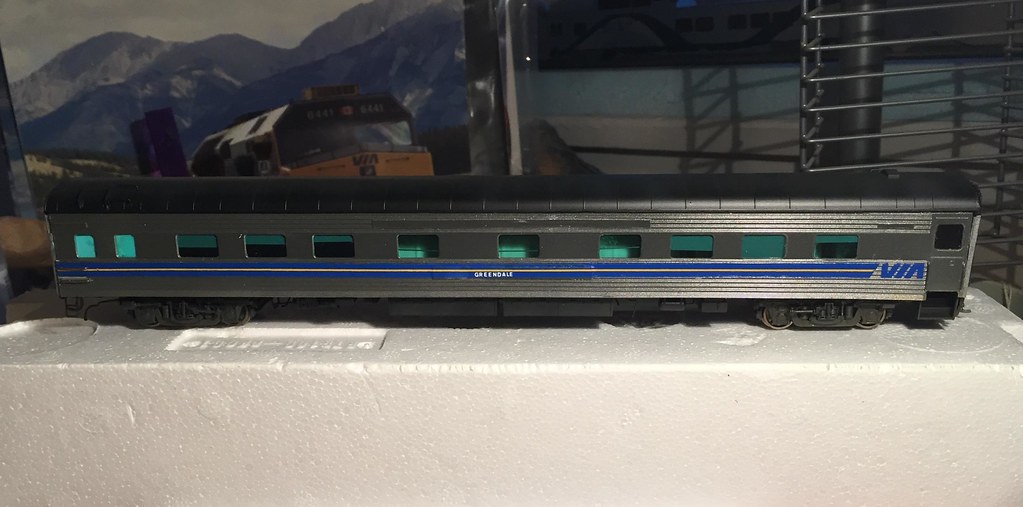 Still getting the hang of it. I'm very happy with how this car turned out, and I've done another one since (a HEP2, which I'll show off soon) using the polished aluminum instead of chrome, and really happy with how that turned out. |
|
|
|
Post by acelaphillies on Jul 23, 2016 21:09:01 GMT -5
Timberly, looking good. You do nice work! I like how you placed the shades at different positions on the interior. Also, stripes look good. After reading that they were dry transfers on the fluting I appreciate them even more!
|
|
timberley
Member
 
Posts: 189
Primary Railroads: VIA Rail Canada, AMT (Montreal)
|
Post by timberley on Jul 25, 2016 12:26:44 GMT -5
Timberly, looking good. You do nice work! I like how you placed the shades at different positions on the interior. Also, stripes look good. After reading that they were dry transfers on the fluting I appreciate them even more! Thanks! The shade placement was quite deliberate, glad you noticed  Unless the car has just been serviced and hasn't gone back into service yet, you'll never see the shades all at one height! Maybe one exception - if the sun is really bright on one side of the car, the crew may pull them all down to try to keep the car cool. Yep, those dry transfers were not easy. Ultimately it just required patience, working slowly and carefully, and a fair bit of touch-up. Fortunately I had a pretty exact matching VIA blue on hand for that purpose. |
|
|
|
Post by slowfreight on Jul 25, 2016 21:36:24 GMT -5
I missed your other two on the first go-round. All 3 look really good. Myself, I tend to do things like the long stripes with paint, but I'll probably try decals on my next Amtrak car.
It's just so much more satisfying to see a train of kitbashed or upgraded cars like these. Can you get a shot of a complete train yet?
|
|
timberley
Member
 
Posts: 189
Primary Railroads: VIA Rail Canada, AMT (Montreal)
|
Post by timberley on Jul 27, 2016 10:05:37 GMT -5
I missed your other two on the first go-round. All 3 look really good. Myself, I tend to do things like the long stripes with paint, but I'll probably try decals on my next Amtrak car. It's just so much more satisfying to see a train of kitbashed or upgraded cars like these. Can you get a shot of a complete train yet? Thanks! I have done some striping with decals, some with paint. For Budd letterboards, I much prefer to use paint, because it's easy to mask the area off and I avoid having to deal with any little bubbles, etc. But some striping (especially thinner stuff along edges) can be nice to do with decals, especially where you want to guarantee a nice sharp line. It's never easy to keep it straight, but masking can run into the same issues... I will very soon be able to put together a fully kitbashed Corridor train, with the HEP1 ex-UP baggage, some HEP2s that I'm working on (one is finished so far), and that HEP1 coach thrown into the mix. The main thing I'm waiting on is for USP to do up some additional sides for the other HEP2 styles that I need (especially the Club cars). However, if I mix and match with some Rapido LRCs (which I have upgraded in various ways and weathered), I can put together a reasonably prototypical train. Here's an example, from the recent second annual Maritime Prototype Modellers Meet in Truro, NS. I had put together two "trains", along with a bunch of my other stuff just out there on display. First, here you can see my superdetailed P42, along with my recently completed Kool-Aid 6404, on the head-ends. The ex-UP Baggage car is behind 6404, and you can see that I've since weathered it up a bit for a more in-service look. In the background, you can see a few of my other projects that I've posted about on here (VIA 202, AMT 243, and an AMT NJT-leased GP40FH-2 shell). The orange units are for the now GWI-owned Cape Breton and Central Nova Scotia RR.  For the train in the foreground, I've gone for a typical mix-and-match Corridor consist. At the front is an LRC Club car providing VIA 1 service. This is a Rapido club from the first RTR run. I added the VIA 1 and Canada logos, rooftop and window emergency access decals, and the WiFi antenna array (provided in the box by Rapido). I also decalled over the factory stripe and VIA logo with Rapido's LRC decals, because the yellow on the original run was waaaaay too light. Finally I weathered the car to match the heavy accumulation of grime on these cars over their 30+ year service life. The sides get cleaned (somewhat) from time to time, but the roof and ends don't! I also managed to sneak into this photo - in the red shirt in the top left corner, enjoying an excellent weathering clinic while someone else took photos.  Finally, here's a bit more of the trains. Behind the LRC Club is my first complete HEP2 coach. Built from USP sides on a Walthers core, this is one of VIA's ex-SP cars, rebuilt in the mid 90s to match the LRCs inside. Behind it you can see the front of one of two more that I'm working on building up right now. In behind, the second train has my HEP1 coach behind the baggage, and an unusual visitor behind it - Panorama 1720, which would be much more at home on the Canadian! Oh well, my lucky passengers get a special treat :-P Greendale is visible right behind. This photo also shows the difference in some of the Alclad applications. The HEP2 in the foreground was done with Polished Aluminum, while the others were done with Chrome (all over grey bases).  |
|
|
|
Post by antoniofp45 on Mar 19, 2017 8:54:35 GMT -5
WOW!
How did I miss this? Timberly nice work sir! I need to check in more often. Please PM me (if you don't mind) whenever you post your work. Due to my job, for a while I had less forum lurking time and missed some really nice threads.......like this one. One thing, it looks like you're using a flash on your camera. Respectfully, I suggest avoiding it when possible as the reflective metalized surface will cause your digital camera or cell phone to automatically darken the image. Take a few shots outdoor (not in direct sunlight), or indoors with natural lighting coming through windows. Please post some more photos 
|
|
timberley
Member
 
Posts: 189
Primary Railroads: VIA Rail Canada, AMT (Montreal)
|
Post by timberley on Mar 20, 2017 11:50:52 GMT -5
WOW!
How did I miss this? Timberly nice work sir! I need to check in more often. Please PM me (if you don't mind) whenever you post your work. Due to my job, for a while I had less forum lurking time and missed some really nice threads.......like this one. One thing, it looks like you're using a flash on your camera. Respectfully, I suggest avoiding it when possible as the reflective metalized surface will cause your digital camera or cell phone to automatically darken the image. Take a few shots outdoor (not in direct sunlight), or indoors with natural lighting coming through windows. Please post some more photos  Thanks  I can certainly try to remember to loop you in on future ones! I haven't been using a flash, but I was using a hand-held lamp to try to get better lighting on the subject - so that's likely causing the issue you're noting. I really do need to put together a better photo-booth setup - I recently moved to a new place, so maybe I can do that here. I completely agree with the outdoor natural lighting suggestion. I've been hoping to build a small photo diorama that I could set up outside for exactly that kind of purpose. Hopefully soon! |
|


