|
|
Post by slowfreight on Apr 12, 2017 21:26:01 GMT -5
This particular problem needs to start with a shout out to AntonioFP45, since no one else has as much experience with Alclad.
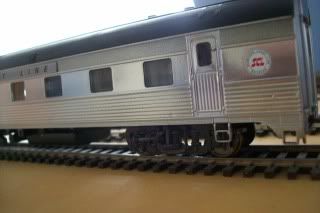
So I'm working on a project to modernize a plated Walthers car. Needed to remove the "Santa Fe" lettering from the letterboard. Per multiple threads online, folks said brush on Solvaset and scrub off with an eraser. I don't know how many times Walthers may have changed the formulation of the plating system, but I was horrified as the Solvaset took off the clear coat and even exposed a little of the copper cladding under the stainless coat.
Of course, this is an otherwise fully-assembled deluxe car with peopled interior.
Stainless cars varied in shade, so if my car isn't a dead-on match for the rest of the cars in the train it's ok. But can I get away with blowing a coat of Alclad stainless directly over the existing finish without giving an undercoat? Any other thoughts on how to fix the finish without doing a total strip/repaint? I can post pics when I get home this weekend, but as I said the clear coat is partially damaged and will need to be painted over.
|
|
|
|
Post by antoniofp45 on Apr 13, 2017 17:26:27 GMT -5
Hi Slowfreight! Sorry about what happened as I understand that's frustrating. Sincerely, I'm humbled by your vote of confidence. Thank you, I hope this will be helpful. Photos taken at varying angles and distances would be very helpful. First, I would not recommend applying Alclad-2 directly on top of the Walthers finish. Alclad-2 is VERY transparent and will not hide any abrasions or marring that resulted from using Solvaset. Suggestion: (based on the description you've provided) This would be easier to do if the shell was off the chassis, but can still be done if disassembly is going to be a headache. 1. Using high quality tape, along with making paper, mask off the area surrounding the name board. Make sure that you have a snug seal. 2. If the name board is marred and does not feel smooth, wet-sand with 3M 800 grit wet/dry paper. Once smooth, finish wet-sanding with 1500 grit wet/dry paper. Check the board and make it is smooth and free of sand scratches. 3. Take off the masking tape and paper. Check the areas above and below the letter board to make sure all is well. Wipe the board with a clean cloth dampened with glass cleaner or wax & grease remover. 4. Mask off the name board again. Make sure that the tape adheres well as you want to avoid potential bleed-throughs. The following is likely considered as overkill but...... WRAP THE ENTIRE CAR WITH PAPER. Just use a larger sheet of paper that extends from the masking tape applied below the letter board, wrap it underneath the car, up to the roof, and on to the tape above the name board. For plated and metalized cars, I'm a believer in the old adage: 1 oz of prevention is more valuable than 10 lbs of cure. 5. Air brush a glossy gray undercoat (preferably NYC DK Gray) on to the name board. I do prefer Scale Coat II because of its high gloss yield. It's just a one step application and does not require a separate clear coat. Key is that it's properly thinned and flows out smoothly. Before applying the undercoat test it on some scrap samples of plastic. It's important that the undercoat lays very smoothly. No rough spots. 4. After your undercoat has cure, apply Alclad-2 (formula #105) on to the name board. Remember, very light strokes. Don't pile it on. Again, practice on the scrap sample. Keep the air pressure low. 2 to 3 coats will likely be all that you need. 5. If the board looks good to you, seal it with either a gloss or semi-gloss clear. Once the clear flashes off, if you wish to dull it down slightly, just apply another thin coat. Each successive coat of clear dulls down Alclad's appearance. HOWEVER, be careful as to many coats will make the Alclad-2 look like an ordinary silver. I hope this helps. Please post the photos of the damaged section when you can.  |
|
|
|
Post by slowfreight on Apr 13, 2017 18:34:27 GMT -5
Uh oh. This is gonna be tough. Finish damage is not confined to the letterboard. The plastic surface isn't damaged, nor is the paint, but the clear coat looks kinda like a 15-year-old Santa Fe warbonnet scheme. Fortunately, I have a donor car that I can practice on, but I may be stuck repainting everything above the window band on both sides and roof if I can't just overlay.
I will definitely get good pictures this weekend. Right now, though, the car is 200 miles from here.
|
|
|
|
Post by slowfreight on Apr 15, 2017 9:43:54 GMT -5
|
|
|
|
Post by antoniofp45 on Apr 15, 2017 17:27:06 GMT -5
Thanks for posting the photos. Work is required but, imho, this is repairable. However, imho, Alclad-2 alone will not fix this. NOTE: It will be much easier to take the unit apart so that you can lay the car's sides down on a clean flat surface. Remove the glazing and vestibule grabs as well. ROUTE 1 (If you prefer not to do any paint stripping) You will need: 800grit Wet/Dry paper. 1500grit Wet/Dry paper. A 3M Ultra Fine Gray Scotch pad (click on this link to see a sample)-> ep.yimg.com/ca/I/stylespilotshop_2281_1967735716 (or equivalent). A small bowl containing warm water, mixed with one drop of Dawn or Ivory Liquid. Cut the abrasives into sizes that you can handle for sanding. Let the sandpaper and Scotch pad soak in the pan for at least 10 minutes.
A) First clean the plated sides with a clean cotton cloth, lightly dampened with Windex. Next, mask off the corrugated sections below the window line and above/next to the name boards. Mask off the vestibule door frame as well (easy to do without those handrails). Make sure the tape seals snuggly. B) CAREFULLY wet-sand the damaged sections and name boards with the 800 grit paper. (to wet sand the name boards, roll your paper into the shape of a pencil) .The Santa Fe lettering will come off. Feather-sand the damaged area so that it transitions smoothly to the undamaged area. You'll know you're done when you can close your eyes, lightly stroke your finger over the area, and not feel any ridges or abrasions. Take your time, this won't be a 60-second "quickie". (Tip: when I do something like this, I have some relaxing music playing in the background) C) Once it feels smooth, wet sand the damaged and feathered areas with the 1500 grit paper. Include the letter boards. The 1500 grit will remove the 800grit sand scratches. Take your time. D) Remove the masking tape that's next to the name boards. With the soaked Scotch pad, carefully wet-sand the entire window board, the name board, and the corrugated sections next to the name board. Cool feature about the Scotch Pad is that, using light to medium pressure, it will scuff the corrugated pleats but not damage them like sandpaper would. But you can apply some pressure to the window board sections. When finished, dry off the wall and inspect it. Re-scuff any spots that you missed with the Scotch pad. Once you're done. Wipe the surface with the dampened cloth and inspect your work. The plating on the window board should appear very dull. The window board, name board, and corrugation next to the name board should all feel smooth. E) Pull the masking tape off of the bottom and vestibule and inspect the entire wall. F) Re-mask those sections again with fresh tape and masking paper. NOTE: A GOOD, multi-bulb LED FLASH LIGHT WILL BE HELPFUL FOR THE NEXT STEPS. 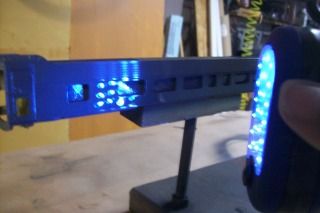 G) G) Basecoat: (PLEASE PRACTICE ON A SCRAP PIECE FIRST). Apply one to two smooth, thin, wet coats of gloss gray to the entire sanded section (window line and up). Although not 100%, NYC DK Gray will get you reasonably close to Walthers current finish. To make it easy, lay your sides down flat on top of clean paper or glass. Don't pile the paint on. After applying your basecoat, inspect it up close with the flashlight. If it looks smooth, allow it to cure. H) Using the procedures on my other threads, apply Alclad 105 and seal with a gloss or semi-gloss clear. ROUTE 2: Simpler steps but may be more challenging: Strip the walls completely and follow the Alclad-2 metalizing procedure that I've posted on other threads. The challenge with this is that Walther's current plating does not strip off so easily with 91% alcohol. So either a longer soaking time or a stronger solution may be required. |
|
|
|
Post by slowfreight on Apr 15, 2017 21:03:14 GMT -5
Thanks for the long explanation. I will follow route 1, I think. That way, I'll get the lettering off and have a uniform finish. I can ignore the damage between the windows, as the car will get Amtrak Phase II striping. I'll refinish the sides above the windows and the roof, but not the ends, so it should be pretty hard to tell that I refinished anything. It will look like this when it's done:  Amtrak 2983 Pine Arroyo 5-1979 mb Amtrak 2983 Pine Arroyo 5-1979 mb by mbernero, on Flickr Once I make headway on the repair, I'll post a separate thread on the car. It's part of my effort to build a 1980-era Amtrak train, initially patterned after the Chicago-Duluth North Star. |
|
|
|
Post by antoniofp45 on Apr 15, 2017 21:44:57 GMT -5
OK, cool.
Something to consider.
If you're using Microscale decals, I don't think that the Phase II decal stripes will hide the dark gray primer that's on the damaged section of the window board. You'll see a dark splotch underneath the Amtrak decal on that spot, which may be distracting.
I suggest, respectfully, that you consider sanding that section to a smooth finish. You can then mask it off and apply either Alclad or a smooth silver paint to it, followed by a clear.
It is a hassle, but it's a beautiful car and, unfortunately just like Alclad........plated finishes are unforgiving when it comes to revealing abrasions and mistakes.
|
|
|
|
Post by backshophoss on Apr 15, 2017 21:59:50 GMT -5
That car was one of the first HEP rebuilds.
|
|
|
|
Post by slowfreight on Apr 16, 2017 7:57:33 GMT -5
That car was one of the first HEP rebuilds. Exactly. The ex-ATSF cars were converted first, and seen often with Amfleet cars on medium-distance trains. They make for some nice interest if you want a train longer than a 2-car Blackhawk. AntonioFP45, the window band is all the same color...no exposed grey primer, just missing clear coat. How bad it looks depends on angle and lighting, and unfortunately I don't have a good photo booth set up in the basement yet. I only just finished building the train room about a month ago. |
|
|
|
Post by backshophoss on Apr 16, 2017 15:18:54 GMT -5
I might be out in left field,but painting a white "undercoat" at the window band could help the Microscale decal look better??  |
|
|
|
Post by slowfreight on Apr 16, 2017 15:48:24 GMT -5
I might be out in left field,but painting a white "undercoat" at the window band could help the Microscale decal look better?? Great idea. I will have to try that. I can buff out the gouge in the clear coat to make sure it doesn't show through, and hit it with a gloss white. |
|
|
|
Post by slowfreight on Apr 16, 2017 15:53:19 GMT -5
Thanks for posting the photos. H) Using the procedures on my other threads, apply Alclad 105 and seal with a gloss or semi-gloss clear. Previously, I bought Alclad 115...can you explain where to use the different flavors again for us slow types? (Refer to screen name.) |
|
|
|
Post by antoniofp45 on Apr 16, 2017 21:48:37 GMT -5
With my experiments, I initially used various formulas, including the Alclad 107. The 105's formula is similar to the 107's, however, it's toned down which means that it takes fewer coats of clear to bring down the sheen. Both, the 107 and 105 more closely resembled the 300-series austenitic stainless steel used by Budd. The 105's appearance changes noticeably when it's applied over a gray basecoat foundation instead of black. However, you can still achieve a good effect with the #115. I just tend to be a bit picky. For blending a stainless steel appearance, I still respectfully suggest using either Alclad itself or a silver. White may work, however imho, it's like playing Russian roulette. The closer a metalized repair blend resembles its surrounding area, the more likely better the results will be. Again, just my opinion. Here is an Alclad thread that may be helpful. I hope I'm not violating any forum rules) atlasrescueforum.proboards.com/thread/863/alclad-basic-steps-stainless-trains |
|
|
|
Post by backshophoss on Apr 16, 2017 22:36:25 GMT -5
Not worried about that unless Acelaphillies has a concern. The "bigger" problem is access to the product,have the creators of Alclad ever done a "pitch" to Walters,to get them to carry the product line? That might help the entire hobby. With Polyscale/Floquil lines dead as a Dodo,have you gotten a copy of the MRH color conversion chart yet?(A freebe for subscribers) You might need to redo your paint mixes as your paint stash "dries up"   |
|
|
|
Post by slowfreight on Apr 16, 2017 22:49:10 GMT -5
AntonioFP45,
The white wouldn't be for blending the surface. It would just be a base behind the decal stripes, if they prove to be translucent. The way I will repaint the stainless finish, the striping (and the end of the car) gives a hard break between original and repaired stainless.
backshophoss,
Nope, don't have the paint conversion chart.
Best source I've found for Alclad (and paint and glue in general) is ebay. I will be ordering up a bottle of 105 this week. If I had a good LHS, I would frequent it more, but the closest LHS is 85% tinplate...AND at great prices...which is starting to create another monster in the household. I keep reminding the boss that it's still cheaper than if I had a muscle car as a hobby.
|
|